

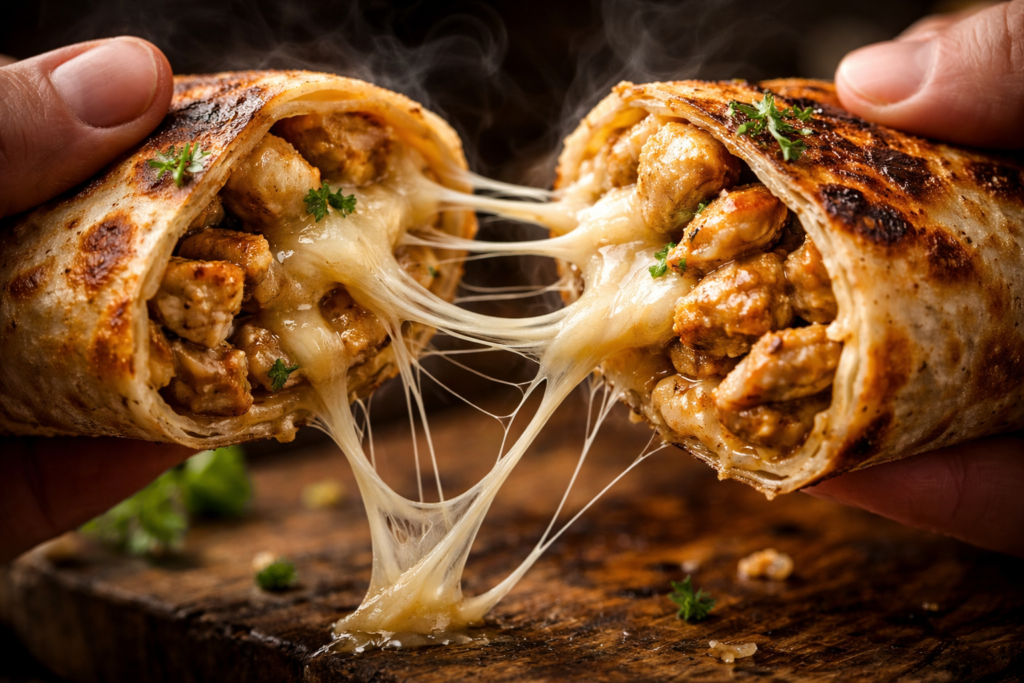
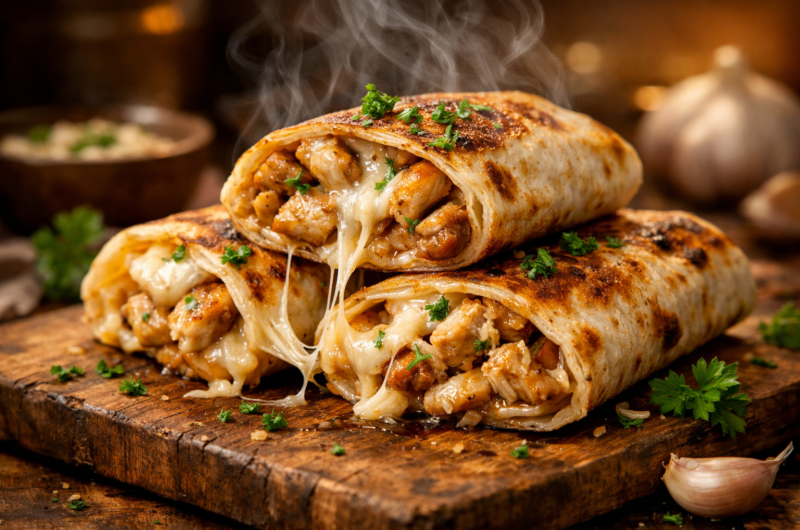
These low carb cheesy garlic chicken wraps became my weeknight lifesaver the minute I realized I could enjoy a hot, crispy, cheesy wrap without the heavy carb slump afterward. That first bite sealed the deal. Golden on the outside, gooey cheese stretching with every pull, and juicy garlic chicken tucked inside. Comfort food vibes, minus the crash.
I actually threw these together one night when I was this close to ordering takeout. I had leftover rotisserie chicken in the fridge, a few random cheese blocks, and some low carb tortillas. Twenty minutes later, we were eating wraps so good my husband genuinely thought I’d ordered from our favorite spot. The creamy garlic cheese mixture coats the chicken perfectly, keeping it moist and packed with flavor. Even my protein-loving teens devoured them without asking questions. To them, it was just really good food.
Prep & Cook Time
- Prep Time: 10 minutes
- Cook Time: 8–10 minutes
- Total Time: 18–20 minutes
- Servings: 4 wraps
Quick, simple, and totally weeknight-friendly.
Ingredients for Low Carb Cheesy Garlic Chicken Wraps
I almost always use rotisserie chicken because it saves time and brings extra seasoning. For tortillas, Mission Carb Balance wraps hold up beautifully and don’t tear when you roll them. And here’s a small tip that makes a big difference: shred your own cheese. It melts smoother and tastes better.
- 2 cups cooked chicken breast, shredded (rotisserie works great)
- 1 cup shredded mozzarella cheese (freshly shredded melts best)
- 1/2 cup shredded cheddar cheese
- 2 cloves garlic, minced (add more if you love garlic like we do)
- 1/4 cup cream cheese, softened
- 1 tablespoon olive oil
- 4 large low-carb tortillas or wraps
- 1 tablespoon fresh parsley, chopped
- Salt and pepper to taste
- Handful of baby spinach (optional, but adds extra nutrition without changing flavor)
How to Make Cheesy Garlic Chicken Wraps
Let your cream cheese soften first. It blends much easier and gives you that smooth, creamy filling.
Step 1:
Heat a skillet or grill pan over medium heat and add the olive oil. While it warms up, microwave your tortillas for about 10–15 seconds under a damp paper towel. This keeps them flexible and prevents cracking.
Step 2:
In a bowl, combine the shredded chicken, mozzarella, cheddar, cream cheese, garlic, parsley, salt, and pepper. Add spinach if you’re using it. Mix everything well until the cream cheese coats the chicken evenly. If it’s a little stubborn, mash the cream cheese with a fork first to help it along.
Step 3:
Divide the mixture evenly between the four tortillas. Keep it centered and don’t overfill—about 1/2 cup per wrap works perfectly. Roll them tightly, tucking in the sides like a burrito.
Step 4:
Place the wraps seam-side down in the hot skillet. Cook for 2–3 minutes per side without moving them around. You want that golden, crispy exterior. When the cheese starts to melt and peek out at the edges, they’re ready. If they brown too fast, lower the heat slightly. Slice in half and serve while they’re hot and melty.
Nutrition Information (Per Wrap – Approximate)
- Calories: 420–450 kcal
- Protein: 38–42g
- Fat: 26–30g
- Carbohydrates: 8–12g net carbs (depends on tortilla brand)
- Fiber: 10–15g (from low-carb wrap)
- Sugar: 2–3g
- Sodium: 650–800mg
This recipe is high in protein, moderate in healthy fats, and low in net carbs, making it great for low carb or keto-style eating. Using rotisserie chicken may slightly increase sodium, so adjust salt if needed.
What to Serve with Low Carb Chicken Wraps
They’re filling on their own, but adding a simple side turns them into a complete low carb dinner.
Arugula Salad
Peppery arugula with olive oil and fresh lemon juice cuts through the richness of the cheese beautifully.
Roasted Vegetables
Zucchini, bell peppers, or asparagus roasted with olive oil and herbs add color and fiber without loading on carbs.
Cucumber Tomato Salad
Cool, crisp, and refreshing. Toss with red onion and a light vinaigette for balance.
Garlic Herb Greek Yogurt Dip
Mix Greek yogurt with garlic, herbs, and lemon for a creamy, protein-packed dip that pairs perfectly.
Cauliflower Rice
If you want something more filling, seasoned cauliflower rice works great and keeps the meal keto-friendly.
Storage and Reheating Tips
Store leftover wraps in an airtight container in the fridge for up to two days. I like to place parchment paper between them so they don’t stick together.
For reheating, skip the microwave. Use the oven at 350°F for 8–10 minutes to bring back that crispy outside and perfectly melted cheese. Honestly, they’re not bad cold either if you need a quick, protein-packed lunch.
If you’re meal prepping, assemble the wraps ahead of time and store them uncooked in the fridge. Toast them fresh when you’re ready to eat.
Final Thoughts
These low carb cheesy garlic chicken wraps prove you don’t have to give up comfort food to eat healthier. They’re easy, satisfying, and packed with flavor. Minimal prep. Simple ingredients. Big payoff.
Cheesy Garlic Chicken Wraps | Easy Low Carb Dinner
Course: Dinner, Recipes4
servings10
minutes20
minutes420–450
kcalIngredients
2 cups cooked chicken breast, shredded (rotisserie works great)
1 cup shredded mozzarella cheese (freshly shredded melts best)
1/2 cup shredded cheddar cheese
2 cloves garlic, minced (add more if you love garlic like we do)
1/4 cup cream cheese, softened
1 tablespoon olive oil
4 large low-carb tortillas or wraps
1 tablespoon fresh parsley, chopped
Salt and pepper to taste
Handful of baby spinach (optional, but adds extra nutrition without changing flavor)
Directions
- Heat a skillet or grill pan over medium heat and add the olive oil. While it warms up, microwave your tortillas for about 10–15 seconds under a damp paper towel. This keeps them flexible and prevents cracking.
- In a bowl, combine the shredded chicken, mozzarella, cheddar, cream cheese, garlic, parsley, salt, and pepper. Add spinach if you’re using it. Mix everything well until the cream cheese coats the chicken evenly. If it’s a little stubborn, mash the cream cheese with a fork first to help it along.
- Divide the mixture evenly between the four tortillas. Keep it centered and don’t overfill—about 1/2 cup per wrap works perfectly. Roll them tightly, tucking in the sides like a burrito.
- Place the wraps seam-side down in the hot skillet. Cook for 2–3 minutes per side without moving them around. You want that golden, crispy exterior. When the cheese starts to melt and peek out at the edges, they’re ready. If they brown too fast, lower the heat slightly. Slice in half and serve while they’re hot and melty.